Did you do your homework from last time? If not, STOP! Go back and re-read my post from last week and make your list (READ THIS). In order to move on and completely get a good system for organizing your digital photos, you’ve got to do this right and from the start. So once you’ve got your list, read on…

Okay, so now on to Step 2 (part A).
The endgame for this step is that you’re going to consolidate all your images into one place. But first, you need to decide two things…you need to decide where this one place will be and create a backup plan to make sure all your memories are saved. I’ll break down these steps below.
Part 1 – Set up a Photo Hub
You need to decide on a central area that will be your new photo hub. All your old images will be transferred here and any new images from here on out. There are many options here, but just remember to keep it simple and convenient for you. Your central photo hub could be just the hard drive of your computer or laptop (if you have space available) or you could use an external hard drive or travel drive. For me personally, I have a Seagate BackupPlus Slim (see it on Amazon)
I like this option because it’s small and portable. And makes working on the go easy. I can work at home, in the car rider line, at swim practice, or by the pool if I want (and if my laptop is charged).

One thing you need to think about is how much space will you need – a couple of gigabytes or would terabytes give you more growing room? Think about how many images you currently have (or potentially may have). Saving all of your scattered images to your computer hard drive might not be an issue if you have a small amount, but if you have a ton of images (like me – 🙋) that need saving & sorted you may need more space. This is why I like the Seagate – it has about 2TB amount of space and inexpensive enough to add one or two more if I need to in the future.
So, your first assignment for step 2 of organizing your photos, is to decide how much space you need for your photo hub and what do you need to purchase. Before you actually go out and buy a new external drive, read part 2 below (you may want to get a 2nd one for backup purposes).
——————————————————————————————————————————-
Part 2 – Make a Backup Plan
Did you notice I didn’t mention anything about “the cloud” above as a central photo hub? That’s because you should use “the cloud” as an extra precaution in your back up plan, not as the one and only storage location. YOU MUST HAVE A BACK UP PLAN.
The most common method of a digital backup plan is what’s called the 3-2-1 plan. With this backup plan, you will have 3 different copies of your images, you’ll use two different storage types or storage media, and 1 copy will be offsite. So to break this down, a 3-2-1 back-up plan of your images might look like this:
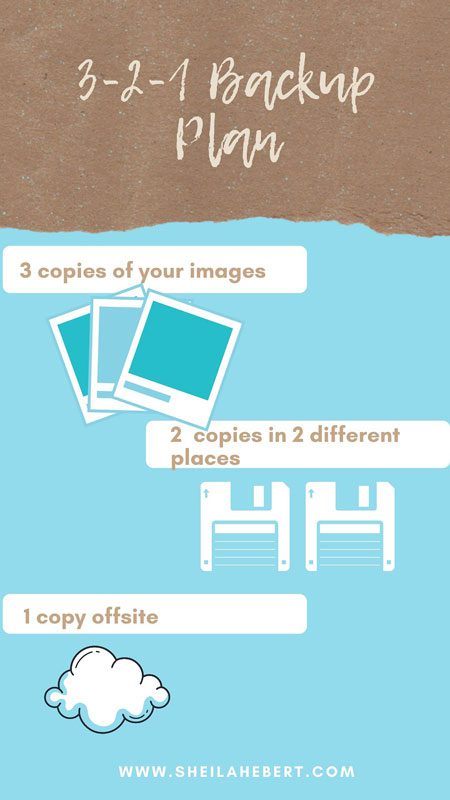
3 separate copies of your images might be:
- 1. Your photo hub drive
- 2. On a second hard drive as a dedicated back-up drive.
- 3. A cloud back up (whether it be google photos, amazon photos, or any other cloud back-up service).
So there you have it: 3 copies of your images, on at least 2 different types of media (drives), and at least one in a different location. I also recommend a 4th back-up step and that is to PRINT (we’ll get to that later though). Now do you really need to follow the 3-2-1 plan? In my opinion …YES! I know it does seem like a little overkill and maybe it is. But these are your memories we’re talking about!!! Would you be okay if your hard drive crashed and you lost all of your memories??? Not me – in fact, it has happened, and I literally get sick to my stomach thinking about it🤢. At the very least, at least make 2 copies of your images (but 3 is really better).
Just in case you’re wondering what my professional and personal backup plan looks like
- Download images to photo hub or my working hard drive
- Backup images to a separate drive (2 actually)
- Backup to a cloud service
- And finally, I print (yes, printing counts as backup)!
In short, for part 2 you need to set up your backup plan. Plan it out and put it into action.
In the next week or so, I’ll be back with the next part of this step. But before I go on, I want to make sure you have enough time to get everything you need for your photo hub and back-up system. Questions on this? Just send me an email and I’ll do my best to help you out. Just remember…KEEP IT SIMPLE & and any plan is better than no plan.
TIPS ON TUESDAY – SAVE YOUR STORY CONTINUED – PART THREE … SHEILA HEBERT – SPLENDORA, TEXAS PHOTOGRAPHER - Sheila Hebert Photography[…] Set up a photo hub and create a backup plan. (read more) […]